Fabio the Peacock, who has taken up residence in the garden of the farm where my studio is, decided to come up and display outside while I was working and listening to Tom McRae!
My amazing family have bought me a really good pair of canvas pliers for stretching my paintings and canvas. And I was allowed to have them now, an early birthday present, because I need them to prepare for my show. I read carefully the article I mentioned previously about stretching canvas and decided to give this new method a go.
http://www.goldenpaints.com/justpaint/jp17article1.php
We are all taught at college to stretch canvas from the middle of each side out towards the corners and to fix the corners last. James Bernstein explains that to do it this way causes stress at the corners that leads, over time, to damage of the paint surface and bagging of the canvas, which does the same.
So I resolved to give it a try: I had my thumb tacks, canvas pliers, polypropylene tape, stretchers, unprimed canvas and a finished painting at the ready.
I decided it would be prudent to begin with the unprimed canvas to try the method out, rather than risk damaging the completed painting. I adapted the method described in the article, because the canvases are so large and I was working on my own.
Carefully lay out the stretcher onto the canvas.
Making sure the stretcher is square to the grain of the canvas. Pin with thumb tacks in the middle of each side, and at even points, just to hold it in place while you start to staple it in place from the corners. Cut some tape a bit longer than each side, to allow some slack while stapling it down.
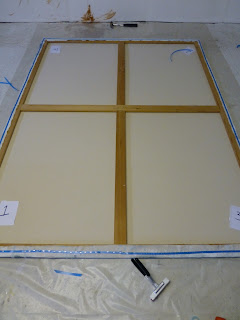
Starting at the corners, (I numbered them so I could work with diagonally opposite corners in rotation without forgetting which corner was which!) Fold the corners neatly, thumb tack in place and when happy, staple them down through the tape, which protects the canvas threads from being cut by the staples.
Work methodically out from each corner in turn, towards the center of each side, stapling through the tape. I allowed some slack with the tape for ease of movement, which I then cut at the center and trimmed to fit . It should be noted that staples need to be placed at about 1 1/2" intervals to prevent any bagging, so if you are going to try this method, make sure you buy plenty!
Result! A tightly stretched canvas, propped up in the only space available, across the doorway! It has had one good coat of gesso, thoroughly worked into the grain of the fabric; I will give it another coat tomorrow, before I start work on the actual painting.
So, having successfully stretched a blank canvas, it was then time to remove the completed painting that was stapled to the wall and to repeat the process. I managed to remove the painting without too much trouble; my new staple remover helped to make this stage of the operation stress free. Taking the canvas off the wall was a little tricky on my own, but I managed, with help from some strong masking tape to hold the canvas for a few seconds while I removed the last staples supporting it on the wall. I transferred the painting from the wall, onto the plastic on the floor without creasing it, which was a minor miracle, I thought.
Then it was time to repeat the whole process with the painting. (The white shape against History Painting is a piece of polystyrene that I used to buffer the stretcher while it rested against it, once I'd checked it was square.)
They don't look like much, but these canvas pliers worked like a dream and made it possible to get the canvas really tight. You can see my corners numbered clearly in this pic!
The stretched painting, on its side because I couldn't maneuver it upright between the rafters on my own. I was amazed at how I managed to get it stretched so tightly and how good it looks.
The staples I used are heavy duty 6mm, type 4/11/140 if anyone reading this is interested. I didn't want to use any that were too long, that would drive too far into the stretcher and risk cutting the threads of the canvas. I figured that using so many quite close together, they would be long enough to do the job. I used all the ones I had today, so have just ordered some more for when we stretch History Painting at the gallery next week.
I ache all over from being on my knees all day, it took me from just after 12, until 5.40pm with only a short break for lunch, but it is worth it!
Content copyright the artist, all rights reserved.


thanks for sharing Sue, better than a work out any day
ReplyDeleteThanks Sue - what a great post - thanks for sharing & paintings look great bthw
ReplyDeleteGlad you both found this post interesting, and thanks for the positive comment about the paintings Stef!
ReplyDeleteGlad you both found this post interesting. I was really surprised at how good this method for stretching canvases is. Thanks also for the positive comments about the work!
ReplyDelete