Friday 29 March 2013

The Show Opens


I was up early this morning in order to get to the gallery to finish painting out the mirror plates and put the labels on the walls.  Once this was done, I whizzed back home to have something to eat with everyone, pick up the postcards and back to the gallery.

Everything looks really good and I am pleased with the whole exhibition.  Thank you so much to Andy Dalton for your help with the hang and for your encouragement while I was making the work.  http://www.andrew-dalton.com/

2 out of 3 of our kids came to see the show this afternoon; the third was stuck on the M62 for more than four hours, so we'll go again tomorrow so she can see it too.  

Also off to Inspired by...gallery at the Moors National Parks Center, Danby tomorrow for the opening of their show: From What Has Been.  So it will be a busy day looking at art again.  http://www.northyorkmoors.org.uk/visiting/visitor-centres/inspired-by-gallery

Thanks to Chris Thomas and his wife Pauline for dropping by today, I am just so glad I was there to see you both!  Chris was a student of mine when I was teaching Art and Design Adult Education at Queen Mary's College, Basingstoke; he found me on facebook a while back and got in touch.  Chris is currently studying for his MA in Printmaking at Glasgow School of Art and I am looking forward to meeting with him up there so he can show me round the galleries.

There are some nice messages in the gallery book and many people have wished me luck on facebook too, especially fellow members of Ryedale ArtWorks; thank you to everyone for that!  I am stunned that my post on fb with one picture of the show has had 327 hits already.
http://www.facebook.com/SueGoughArtist

http://www.ryedaleartworks.com


Wednesday 27 March 2013

One More Hanging Day To Go and I've Sold a Painting!


History Painting, dominating the space during the hanging selection process


Many, many thanks to Andy Dalton for his help and encouragement today, not forgetting the jokes and fun!

We spent all morning stretching History Painting onto the beautifully crafted stretcher I purchased from Bird and Davis's Artmanufactury.  It went together quite easily with two of us to do it and, despite its really large dimensions, we stretched the painting quite well.

The original idea was to place it on the end wall but it dominated the space far too much, so we changed it and it is now hanging on the long wall on the left side of the space.  We managed to get it up without too much of a hassle.  I am so pleased with the way it looks and very, very glad that I resisted working on it further; I like the rawness of it.


New positions, wrapping still in place on the 2 other large canvases


We placed the newest painting on the end wall and its companion on the right side wall, further down with all the other works placed and spaced well.  I did manage to make the gallery space look very small and I had about 3 times more work than there is space for.  I am sure we have made the right selection and less is more; it is going to look very good, if I say so myself!


I am so pleased with the way this is shaping up


Highlights of the day:

  • Seeing how good the work looks on the walls.
  • Working with Andrew Dalton again
  • Selling a painting before it is even up on the wall to a lovely and interested couple who came to see the work early because they go home to Sheffield before the show opens on 29th March.  


History Painting stretched up at last and looking good!  The lighting will be sorted out tomorrow.


SOLD!


All rights reserved

Tuesday 26 March 2013

Work Delivered and Unpacked!


Wrapped and ready in the studio for transporting to the gallery.


Work all delivered safely to the gallery today, without mishap.  The van driver was extremely nice and helpful.  As was my husband; both our cars were full!

The stretcher from Bird and Davis had been safely delivered to the gallery a couple of days ago and I unpacked it and began to put it together but I'll need my trusty assistant Mr Dalton to help me finish assembling it because it is very large and unwieldy.


I seem to have made The Gallery at Ryedale Folk Museum look very small . . .


There will be some serious editing taking place tomorrow!

Sunday 24 March 2013

Preparing for the Show!


History Painting, removed from the wall, waiting to be rolled up ready for transporting to the gallery at Hutton le Hole.


It's my birthday today!  Because I realised that I needed to be in the studio for a few hours today, we had a lovely meal at our local last night.  I have had some fab presents, the best of which is the canvas pliers I have already used, bought by all my family, as they were very expensive.

Today's chores:

  • Take History Painting off the wall and roll it onto the cardboard tube ready for transporting to the gallery tomorrow at the end of the day.
  • Wrap completed large canvas.  For both these tasks I had Pete's help, for which I am very, very grateful.
  • Finish the other large canvas, about which I have been trying not to panic, especially when it went through a very pink phase.
  • Make a list of everything else I need to remember to do.


Completed large canvas wrapped ready for collection on Tuesday with unfinished one in forground.


Finished canvas, not a good photo as the paint is still wet and there is some flare.


The theme of the newly finished painting is new beginnings/Spring.  It is as yet untitled.  I think the softness of the colour scheme fits the theme well and I think the two large canvases will work well against the more rough and raw quality of History Painting, but we shall see when they go up onto the walls of the gallery on Tuesday!

I am glad that I managed to resolve it quite quickly today because the gas bottle of the calor gas stove chose today to run out and by the time I had finished, my fingers had gone numb.  I am still fervently wishing and hoping that the weather stays clear of snow until I get all the work over to the gallery.

Saturday 23 March 2013

Painful Progress and Slight Panic


It has been bitterly cold all week; the house is more drafty than usual due to a window that was moved in the kitchen and requiring some insulation foam to be sprayed around it again; I've made do with bubble wrap stuffed in the gaps for now!  There are drafts coming in from the front entrance and the back porch too; I was really not expecting to be troubled by icy blasts at this time of the year.  I am seriously considering making some old fashioned draft excluders to lay across the bottom of the doors.  How much longer can this go on?


Pete's just checked on his phone and apparently it is not going to get above 1 degree for the next 5 days.  I am praying that the snow holds off because I have to finish the large painting that I only started last Monday, and we are hanging the show on Tuesday!


I managed 2 hours out at the studio today, with my breath surrounding me in clouds despite the heater being on full blast.  I worked slowly on the painting; I think it might actually be nearly finished.  It has gone from a very bright pink mid week, to a rather beautiful soft painting of pastel colours; the lozenge shapes, that represent the "departed ones", are a soft yellow against the background of duck egg and pink hues showing tally marks behind.  there are other tally marks on the top layer that I've painted in the same yellow, and some that are very similar hues to the blue already extant in the painting and a soft green, which actually almost fluoresces against the other colours.  So although it is quite a "pretty" painting (and I don't usually do pretty), I am enjoying the actual beauty of the colour and the surfaces revealed and concealed.  The theme of this painting is "new beginnings/Spring", so it is appropriate, I think.  Looking at it alongside the completed "endings/Winter", which is mainly strong blue-grey overlaid with graphite, lilac greys and softest of shell pink in places, it works quite well both tonally and in terms of colour.  Phew!


And now I have just realised that I only have tomorrow to finish this painting!  I thought in my head, that I had until Thursday.  Don't ask me why; tell you I cannot. . .   


So my birthday tomorrow will be spent finishing off the Spring painting and. with Pete's help, removing History Painting from the wall and rolling it onto the cardboard tube ready to transport to the gallery.  Monday will be spent wrapping the finished large stretched paintings!


All the pictures show early stages of the painting discussed.  I am glad to say, it looks nothing like this now!  I like working in layers and stages, allowing traces of previous layers to show through in varying degrees; sometimes a previous layer may be completely obliterated for the sake of the overall painting, but I am sure that if the layer had not been there in the first place, the painting would develop differently.


Monday 18 March 2013

A Happy Day Stretching Canvases


Fabio the Peacock, who has taken up residence in the garden of the farm where my studio is, decided to come up and display outside while I was working and listening to Tom McRae!


My amazing family have bought me a really good pair of canvas pliers for stretching my paintings and canvas. And I was allowed to have them now, an early birthday present, because I need them to prepare for my show.   I read carefully the article I mentioned previously about stretching canvas and decided to give this new method a go.  

http://www.goldenpaints.com/justpaint/jp17article1.php

We are all taught at college to stretch canvas from the middle of each side out towards the corners and to fix the corners last.  James Bernstein explains that to do it this way causes stress at the corners that leads, over time, to damage of the paint surface and bagging of the canvas, which does the same.

So I resolved to give it a try: I had my thumb tacks, canvas pliers, polypropylene tape, stretchers, unprimed canvas and a finished painting at the ready.

I decided it would be prudent to begin with the unprimed canvas to try the method out, rather than risk damaging the completed painting.  I adapted the method described in the article, because the canvases are so large and I was working on my own.


Carefully lay out the stretcher onto the canvas.


Making sure the stretcher is square to the grain of the canvas.  Pin with thumb tacks in the middle of each side, and at even points, just to hold it in place while you start to staple it in place from the corners.  Cut some tape a bit longer than each side, to allow some slack while stapling it down.


Starting at the corners, (I numbered them so I could work with diagonally opposite corners in rotation without forgetting which corner was which!)   Fold the corners neatly, thumb tack in place and when happy, staple them down through the tape, which protects the canvas threads from being cut by the staples.


Work methodically out from each corner in turn, towards the center of each side, stapling through the tape.  I allowed some slack with the tape for ease of movement, which I then cut at the center and trimmed to fit .  It should be noted that staples need to be placed at about 1 1/2" intervals to prevent any bagging, so if you are going to try this method, make sure you buy plenty!


Result!  A tightly stretched canvas, propped up in the only space available, across the doorway!  It has had one good coat of gesso, thoroughly worked into the grain of the fabric; I will give it another coat tomorrow, before I start work on the actual painting.  

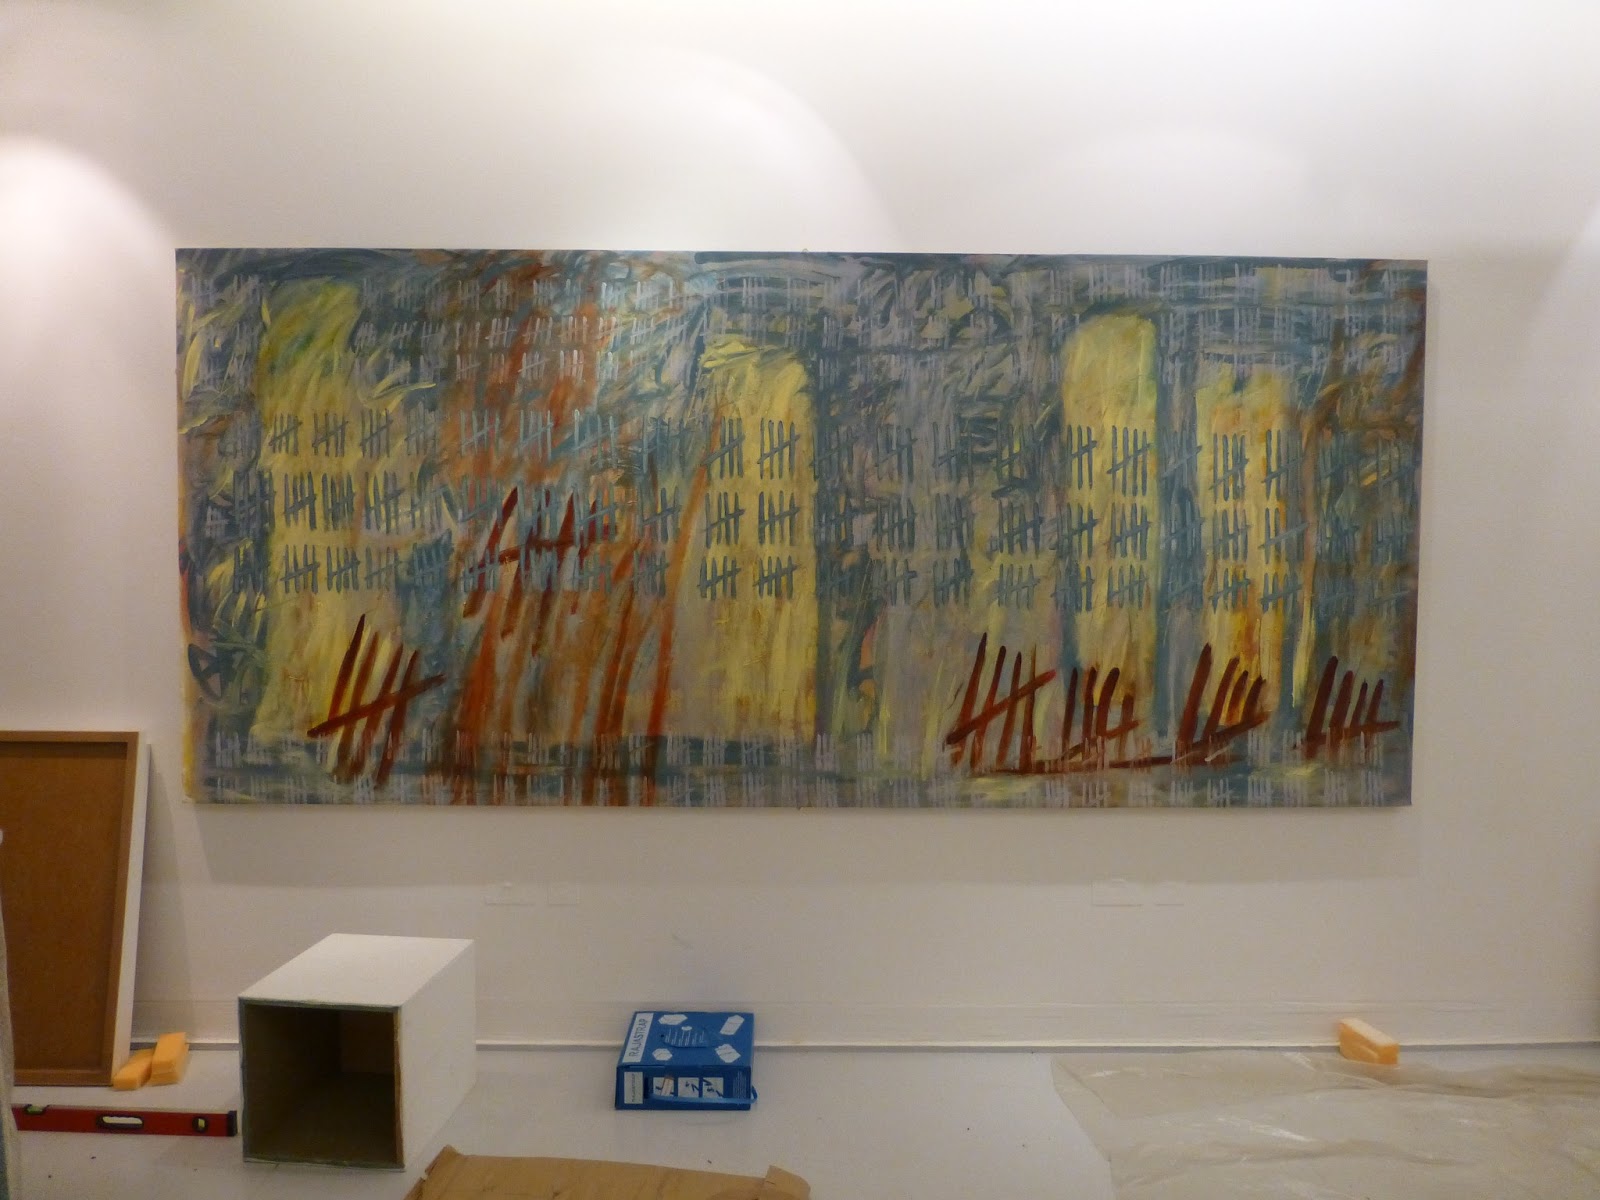
So, having successfully stretched a blank canvas, it was then time to remove the completed painting that was stapled to the wall and to repeat the process.  I managed to remove the painting without too much trouble; my new staple remover helped to make this stage of the operation stress free.  Taking the canvas off the wall was a little tricky on my own, but I managed, with help from some strong masking tape to hold the canvas for a few seconds while I removed the last staples supporting it on the wall.   I transferred the painting from the wall, onto the plastic on the floor without creasing it, which was a minor miracle, I thought.


Then it was time to repeat the whole process with the painting.  (The white shape against History Painting is a piece of polystyrene that I used to buffer the stretcher while it rested against it, once I'd checked it was square.)


They don't look like much, but these canvas pliers worked like a dream and made it possible to get the canvas really tight.  You can see my corners numbered clearly in this pic!


The stretched painting, on its side because I couldn't maneuver it upright between the rafters on my own.  I was amazed at how I managed to get it stretched so tightly and how good it looks.

The staples I used are heavy duty 6mm, type 4/11/140 if anyone reading this is interested.  I didn't want to use any that were too long, that would drive too far into the stretcher and risk cutting the threads of the canvas.  I figured that using so many quite close together, they would be long enough to do the job.  I used all the ones I had today, so have just ordered some more for when we stretch History Painting at the gallery next week.

I ache all over from being on my knees all day, it took me from just after 12, until 5.40pm with only a short break for lunch, but it is worth it!  


Content copyright the artist, all rights reserved.


Sunday 17 March 2013

Does Size Matter?


Not much more to do. . . .


Reflecting on work for the week ahead, namely finishing off "History Painting"  and making a new large canvas, which will be about 5 1/2 by 7 1/2 feet, I find myself wondering why I make life so difficult for myself by making such large paintings.

It is not so much that it is difficult actually making large paintings; all paintings present the same formal problems, the most important ones for me at the moment being colour, gesture, mark making, structure and surface quality.  Large paintings simply scale up the sizes of the brushes or tools, the marks, the areas of colour and size of shapes placed within the picture plane as well as the quantities of media involved.  No, what causes me aggravation is the actual physical problem of stretching the canvases and transporting them.


This book is enormously important to me: my parents bought it through a book club membership when I was very young and I used to pour over it most days after school.  When I was doing my foundation course, my peers were always amazed at my knowledge of art and artists; it all came from this book!  My sister Rachel bought me this copy, knowing what it means to me!

So why do I constantly find myself making large work?  Ever since I was a young girl, looking through "Art Treasures of the World: An illustrated history in colour", (Paul Hamlyn, 1964) most days after school, I was drawn to the reproductions of large paintings within its pages.  It is not that I don't admire smaller work or enjoy making smaller pieces; I do.  I can be just as absorbed making work that is very small as I am by making large stuff; larger does not mean better.  


Pousin, The rape of the Sabine women, was it the word "rape" that engrossed me then, or the rhythms within the work?  I later became totally enthralled by Pollock's paintings with their amazing colour and movement.


So artists have made very large works for centuries.  Botticelli, Birth of Venus.  I am lucky to have been to Florence twice so far, and I have visited this amazing painting each time.


Picasso, Night fishing at Antibes.  I have not seen this work but it looks very large!  I am longing to get to see Guernica in the not too distant future. . . .


A small, beautifully executed art work can have amazing presence and power of communication.   I have been transfixed when standing before all sorts of small works by artists ranging from the Old Masters to Modernist and Contemporary ones.   Turner's small water colours of Petworth House stupify me with their masterful handling of colour and depiction of light.   Constable's small sketches of clouds and landscapes are marvellous but the majesty of his enormous sketches in preparation for the finished works that I saw in the show, "Constable", at Tate in 1991, is awesome.  These examples are some that come immediately to mind, there are hundreds of others I could name with a little more thought and research.

There is something about standing before a painting that dwarfs me, that I can feel enveloped by, that gives me immense satisfaction.  Is it because the marks or gestures have to be scaled up in a larger painting, making evidence of the artist's physical presence more obvious so that  I feel the artist communicating with me directly?  Could be.  Is it the wonder of discerning a painting from afar and then, when up close to it, becoming lost in the wonder of brush marks, colour juxtapositions that make little sense so close, but give continuous delight, then walking slowly backwards, still looking at the painting and seeing it all come into "focus" again and make pictorial sense?  Yes!  
And is it that I am totally in love with painting?  Yes!

Rothko, Delacroix, Rembrandt, Pollock, TwomblyMichelangelo  Picasso, Monet, Braque;  some of many artists who have made very large paintings that I love to get lost in.


And have I answered my own question, why do I make large work, and does size matter?  Sort of. . . .

But: I think my next show might be called Small Is Beautiful.  'Nuff' said!


NB:  All illustrations of and from "Art Treasures of the World" are being used to illustrate this blog and are not intended for any commercial purposes.


Thursday 14 March 2013

Publicity

COME see me on Wednesday 10th April, 4 - 7.30pm!  I'll feed you fine wine and cake!

Wednesday 13 March 2013

Keep Calm. . .


It is snowing hard AGAIN!  

My studio is at the bottom of a very steep farm track and I know I won't make it back up, even if I get down it in one piece.  If I do go out today, IF the snow eases up, I'll have to leave my car at the top and walk down.

Did a bit more work, tentatively on History Painting yesterday, and am now suffering nagging doubt.  Looking at the photo I took, it is improved, but it needs sorting out in some messy areas.  Oh!  The stress of it!


Detail, History Painting, with new painting additions

And I have yet to finish a large canvas as well as stretch up the finished one (and History Painting of course)  I am about to order the stretcher. . . .

I haven't wasted my time stuck at home this morning though.  I have finished the workshop plan, and listed works and their prices for insurance purposes.  That's another agonising thing: pricing work.  I think I've got it about right.  

OK: no more stressing, order that stretcher and book the van!


Some time later. . . 

  • Stretcher ordered in the nick of time for making and delivering it!
  • Awaiting prices from two vans and men.
  • Most of the materials for the workshop ordered, just a few things left that I can buy locally.

Final jobs to complete (apart from the paintings):
  • This afternoon: wrap the black and white works that are going in the browser 
  • Make the labels
  • Write and print insert for my "catalogue" - received the proof of this yesterday and it's surprisingly OK!
  • Tonight: order postcards for inserting into "catalogue"
  • Write and print off price list, making the prices tally with the labels!
  • Sort out sketchbooks and sketches to go in the glass cabinet

After all this, all that needs to be done is the painting: piece of cake!


Winter, study, mixed media


Monday 11 March 2013

The Count Down Begins . . .


Gearing up to my show now and am a bit behind because I have not even started the large canvas I had planned!  However, I have more than enough work to fill the space so the pressure is all self generated.  For the sake of symmetry, I had envisaged 2 large canvases opposite each other and adjacent to the large History Painting.  I'll see what I can manage . . . .   

Jobs to complete before 26th:

  • Framing of final drawings I won't use them all I'm sure, but it's good to have a choice during the hang and they'll be ready for other venues.
  • Order postcards.  This depends on the quality of the ones I have ordered for publicity using the poster design:

Sorry this is a bit distorted: I tried downloading the pdf but for some reason it kept squashing it into a square, which was even worse so I ended up taking a photo of it!

  • Order stretcher for History Painting: I need to check that the measurements we took allow enough canvas around the margins for stretching the painting up.  I think I have, but I am stressing!
  • Deconstruct two of my old stretchers that never got used, take them to the studio and reconstruct them, ready for stretching up the new large paintings.  As I said above, I am hoping there will be two!
  • Buy some new canvas pliers, can't find mine and they weren't all that good.
  • Buy a good staple removing gizmo.  Buy some narrow packaging webbing and some metal pins for stretching the paintings.  (I'll explain why I need these later.)
  • Carefully remove History Painting and the other large canvas from the wall.  Roll History Painting onto a carpet roll as it is too large for the van I am hoping to hire: (I do make life difficult for myself!  We will stretch it up in the gallery)  Stretch up the finished large canvas using the method I have found on the internet.  Stretch up, prime and paint the new canvas.
  • Pack all the work ready for transportation on 26th.
While I was looking on line for some new canvas pliers for stretching up my paintings, I found a very interesting article written by James Bernstein, explaining why the best way to stretch a canvas is NOT as we all were taught, to start in the middle of each side and work outwards to the corners, but to mark up the canvas to make sure it is square, pin the middles of each side to keep canvas in the right place and then to begin stretching FROM THE CORNERS TOWARDS THE MIDDLES !!! This does go against everything I was taught but the explanation is totally reasonable so I am going to give it a go.  I do realise that my really large canvases are going to be difficult to work on though. . . 

Take a look at the article it is really interesting:
http://www.goldenpaints.com/justpaint/jp17article1.php  I use Golden Acrylics, and this company has some really good tutorials online.

It is in this article where I discovered I needed some polypropylene packaging tape and aluminuim push pins.  The pins are for setting out and placing the canvas on the stretcher before stapling and the tape is for placing onto the canvas to protect it from being cut by the staples and it also helps in the awful job of removing staples if a canvas has to be re-stretched, which will be the case with History Painting as it is so large I am going to have to store it rolled onto a carpet roll.

Worked on History Painting again today; it still needs more work but I think I'll be able to pull it off!  

I did adjust the measurements for the stretcher so I shall be able to order it tomorrow.  Before I went to the studio I dropped the drawings that need framing into Anthony Bentley and I gave him an invitation plus some for his shop.  They were delivered a day early, which was great.  http://www.printed.com  is the company I used.  The problem is, they don't use jpegs, which is what I have for all my other images and my IT skills are not up to converting images.  Sigh.

I have reconstructed the stretchers but for some reason one diagonal is longer than the other on both of them, which means they aren't square.  How can this be, when they are all knocked into place with the cross bars?  Any suggestions anyone?  Until I get them square, I can't stretch the canvas onto one of them for the new painting or the finished painting onto the other.

This post has too many words and not enough pictures!  Oh and we had snow again today.


Rummaging in my Drawers . . .


  This must be a sampler using mono printing, trying out marks and layering.  I really don't remember!


I have been rummaging in the plan chests that I retrieved from storage and found my first attempts at Solar Etching, which I did on a day's course at Badger Press in Bishop's Waltham, near where I lived in Basingstoke.  http://badgerpress.org/blog/

I winced at some of them; clearly over inked - an indication of my impatient nature.  I remember being told off for it!  I enjoyed the possibility of layering up photocopied drawings and "found" pieces of ephemera onto one sheet of acetate and then making the print.  The fact that it is possible to create without a light box but by using the sun is also very appealing to me. I like low tech stuff.   I intend to develop more prints using this method in the future, but when that will be remains to be seen!


This was a drawing of a box gas mask I did in the Imperial War Museum, one of my favourite places.  The other piece involved is a paper bag.  Both photocopied onto acetate and then layered up and photocopied again to produce the final acetate from which the plate was then made.  Simples!


I also found a crayon, clearly vintage, one of many I had some years ago that may have been from a clear out in the art department I taught in, I'm not sure.  I think it's the last one and I don't think I can bear to use it as I love the label!


Free Expression - love it!


I'll put some other prints onto my facebook page if you want to have a look.  


Sunday 3 March 2013

Spring: A Time of Optimism and Growth


Frost on the fields early one morning at the end of February


Buds are beginning to swell.  Birds are becoming more vocal.

It is a time of optimism and planning; dreaming.  

We of the Ryedale ArtWorks committee are gathering in membership forms, images and cheques in preparation for the production of the new Directory (of artists, makers and galleries in and around Ryedale).  A development this year, after we were approached by two other regions who saw our Directory, is that our membership have agreed that we should "loosen" our boundaries and welcome artists and makers who are actually outside Ryedale.  This is a positive move; we can only benefit from bringing in artists of quality from wider afield and it should open up more opportunities. 


We have worked furiously on a document for the new Cultural Commissioning initiative, for which we have planned and hope to deliver a number of vital services to creatives of Ryedale.  My main contribution to this has been ideas and proof reading as I do not have a lot of experience at writing proposals; I am learning fast!  RAW is forging links with other groups in the area with the hope of engaging more artists, strengthening relationships between artists. encouraging them to collaborate and promote the work going on in this wondrously beautiful area.  http://www.facebook.com/ryedaleartworks  http://www.ryedaleartworks.com

There are some incredibly talented and successful artists up here, and in the beginning most of them were reluctant to join us; some of them still are.  But as Ryedale ArtWorks consolidates, develops and grows, we are welcoming them gradually into our midst.  As an artist led collective, we will have more influence than we would working as individuals and it is RAW's ambition to persuade all of the successful practising professional artists here to become members.  Then, there will be no limit to what we can achieve, our dreams of a building with gallery space, workshops, studios and office space, as a hub for all creatives in Ryedale and surrounding areas will become achievable.  Our art, craft, performance, architecture and designs will become recognisable to wider audiences in Ryedale, Yorkshire, UK and beyond.. . . . . .eventually!

For members of the committee, (there are only three of us at the moment!) the balance it takes to make this happen while producing our own work, managing exhibitions and attending to the necessary paperwork and planning for future shows is precarious at times and the energy levels can veer between extremely high to rock bottom with the accompanying mood swings.  We of the committee support each other and the other artists/makers in the group are encouraging and kind so we somehow manage to keep the show on the road.


The Directory, 2012

This year should be an incredibly productive one; I am at last functioning properly after some years of ill health (I am fully recovered now), and I can concentrate most of my time on my work. The building work at home is an on-going project that interrupts this occasionally but I will cope with that.  Ryedale ArtWorks is on the cusp of providing much more for creatives in this area and developing as a more widely recognisable name and organisation.

For now though, I have final work and printed matter to make and organise for my solo show at The Gallery, Ryedale Folk Museum, which opens on 29th March.  http://www.ryedalefolkmuseum.co.uk   RAW will concentrate on our core activities of producing the Directory and delivering the group meetings while we await a response to the Cultural Commissioning document we submitted.  Once we receive this response, we shall no doubt have lots more research, planning, discussing and writing to do.

I feel that Spring is a timely metaphor to describe where both RAW and I are at the moment: on the cusp of sudden growth.  I am ready for the hard work, the excitement and for becoming part of making a stronger artistic community.  


Albums of my work and its development can be viewed on :  http://www.facebook.com/SueGoughArtist 

Some of my prints and paintings are currently on the walls of Ashfield Country Manor Hotel, Kirkbymisperton, North Yorkshire:  http://www.ashfieldcountrymanorhotel.co.uk where you can get good beer and really great food.


How beautiful is last night's sunset?